Batch Mode Setup
Mobile batch setup involves:
- Setting the user preferences in the app
- Downloading the app data
- Syncing the app data
- Processing the uploaded data in the web application
User Preferences in Batch Mode
Depending on the features that you have, IntelliTrack Mobile batch preferences may be set for inventory, items,
Inventory Tab
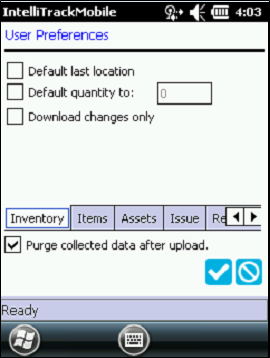
Set the inventory preferences at the Inventory tab. Tap this tab to bring it to the front and set the inventory preference options.
Default Last Location Setting
- When marked, the last location entered remains in the Location field when performing physical counts and single item moves (source location and destination location) for the duration of the current session. Closing the form clears the location entry.
- When unmarked, during a physical inventory or item move session, you must enter the location for each transaction.
Default Quantity To Setting
- When marked, the default quantity set in this field is automatically entered in the Qty field at the Physical Count form and at the Single Move form\Source tab.
- When unmarked, the quantity must be entered for each physical count or item move transaction during the same session.
Download Changes Only Setting
We recommend using this setting AFTER you have downloaded the entire inventory list.
- When marked, only changes made to inventory are downloaded to the mobile application. This checkbox is not marked by default. This is because the inventory must be initially downloaded to the batch application. Mark this checkbox AFTER you have downloaded all inventory to the batch application to henceforth download only inventory changes. This will accelerate download time.
- When unmarked, the entire inventory list will be downloaded to the mobile application.
Items Tab
Set Item preferences at the Items tab. Tap this tab to bring it to the front and to set item preference options.
Note: This tab is found in IntelliTrack Mobile Batch only.
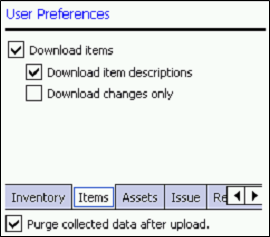
Download Items Setting
- When marked the entire item list will be downloaded during a data sync. For the initial download, this setting must be marked in order to download the items to the batch application on the device.
- Once the entire list has been downloaded to the application, it will accelerate download time if you do not download the entire item list each time that you perform a data download; if this checkbox setting is not marked, the item list will not be downloaded to the batch application on the device.
Download Item Descriptions Setting
The Download Items setting must be marked in order for this setting to be enabled.
- when marked, all item descriptions will be downloaded to the batch application during a data sync.
- unmark this checkbox so that item descriptions are not downloaded to the device with the Item list. (This setting is designed for large item lists. Once the item descriptions have been downloaded to the application, it will accelerate download time if you do not download them each time that you perform a data download.)
Download Item Changes Only
The Download Items setting must be marked in order for this setting to be enabled. This setting is not marked by default because initially the entire item list must be downloaded to the batch application. We recommend using this setting AFTER you have downloaded your entire item list to the batch application.
- When marked, only the changes to the item list (new items, edited items) will be downloaded to the batch application during a data sync. This setting is recommended AFTER you have downloaded your entire item list to henceforth download only item list changes / additions. This will accelerate download time.
- When unmarked, the entire item list will be downloaded to the batch application.
Assets Tab
Note: The role of the logged-in user must have access to the Asset Inventory feature and the Assets feature in order to view this tab.
Set asset preferences at the Assets tab. Tap this tab to bring it to the front and to set asset preference options.
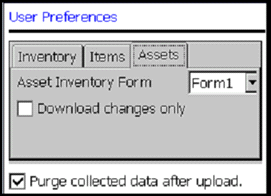
Download Changes Only
- When marked, only the changes to the assets list (new assets, edited assets) will be downloaded to the batch application during a data sync. This setting is recommended AFTER you have downloaded your entire asset list to henceforth download only asset list changes/additions. This will accelerate download time.
- When unmarked, the entire asset list will be downloaded to the batch application.
Asset Inventory Form
Click the drop-down arrow in this field to select the preferred asset inventory form option:
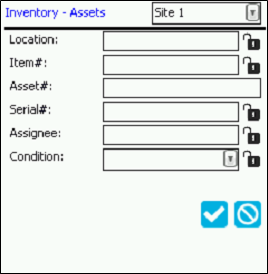
Form 1 (New and Existing Assets)
With Form 1, you may perform the inventory for an entire location in one session. This form shows inventoried assets, assets remaining to be inventoried at the location, and any new assets added during the inventory. When Form 1 is selected, the following form is displayed for performing the asset inventory.

Inventoried: the amount of assets inventoried in this location is displayed.
Remaining: the amount of assets remaining to be scanned/entered into this location is displayed during the inventory session.
New: the amount of new assets scanned is displayed during the inventory session.
Form 2 (New and Existing Assets)
With Form 2, you may perform the asset inventory by counting the asset-location one at a time. Existing assets and new assets may be counted. When Form 2 is selected, the following form is displayed for performing the asset inventory. One asset at a time is placed into inventory.

Form 3 (New Assets)
Form 3 is designed to be used when adding NEW assets to the asset inventory. With Form 3 you may use the Lock feature to expedite asset inventory scanning of new assets. You may also assign a serial number, assignee, and condition to the new asset.
Form 4 (Existing, Inventoried Assets)
Form 4 is designed to be used with EXISTING inventoried assets. The asset number ONLY is scanned at this form. When the asset number is scanned, the asset site-location is automatically used to perform the asset inventory transaction. To use this form, select Form 4 from the Asset Inventory Form Type options in the User Preferences form\Assets tab.

Order Preferences
At the User Preference form, the user may set a default quantity for an issue, receipt, return, pick, or receive and the user may turn drop-down lists ON at each order form. Click each order-type tab to bring this portion of the form to the front.

User Preferences Issue Tab
The following options are available at the Issue tab:
- Default issue quantity to checkbox: When marked, the default quantity set in this field is automatically entered in the Qty field at the Issue Details form.
- Use rapid issue details form checkbox: When marked, the rapid issue feature is used when performing a stock issue; see "Rapid Issue and Rapid Receipt Feature" for more information about this feature. This feature does not use mobile drop down lists.
- Display drop down lists checkbox (this option is available when the role of the logged-in user includes the Mobile Drop Down Lists featureThis is a mobile application feature. When used, drop-down lists for items, locations, and units of measure are displayed at the various order forms in the mobile application.): When marked Location and UOM drop down lists are available in the Issue Details form.
User Preferences Receipt Tab
The following options are available at the Receipt tab:
- Default receipt quantity to checkbox: When marked, the default quantity set in this field is automatically entered in the Qty field at the Receipt Details form.
- Use rapid receipt details form checkbox: When marked, the rapid receipt feature is used when performing a stock receipt; see "Rapid Issue and Rapid Receipt Feature" for more information about this feature. This feature does not use mobile drop down lists.
- Display drop down lists checkbox (this option is available when the role of the logged-in user includes the Mobile Drop Down Lists featureThis is a mobile application feature. When used, drop-down lists for items, locations, and units of measure are displayed at the various order forms in the mobile application.): When marked Location and UOM drop down lists are available in the Receipt Details form.
User Preferences Return Tab
The following options are available at the Return tab:
- Default return quantity to checkbox: When marked, the default quantity set in this field is automatically entered in the Qty field at the Return Details form.
- Display drop down lists checkbox (this option is available when the role of the logged-in user includes the Mobile Drop Down Lists featureThis is a mobile application feature. When used, drop-down lists for items, locations, and units of measure are displayed at the various order forms in the mobile application.): When marked Location and UOM drop down lists are available at the Return Details form.
User Preferences Picking Tab
The following options are available at the Picking tab:
- Default pick quantity to checkbox: When marked, the default quantity set in this field is automatically entered in the Qty field at the Pick Details form.
- Display drop down lists checkbox (this option is available when the role of the logged-in user includes the Mobile Drop Down Lists featureThis is a mobile application feature. When used, drop-down lists for items, locations, and units of measure are displayed at the various order forms in the mobile application.: When marked Location and UOM drop down lists are available at the Pick Details form.
User Preferences Receiving Tab
The following options are available at the Receiving tab:
- Default receive quantity to checkbox: When marked, the default quantity set in this field is automatically entered in the Qty field at the Receive Details form.
- Display drop down lists checkbox (this option is available when the role of the logged-in includes the Mobile Drop Down Lists featureThis is a mobile application feature. When used, drop-down lists for items, locations, and units of measure are displayed at the various order forms in the mobile application.: When marked Location and UOM drop down lists are available at the Receive Details form.
Purge Option
The Purge collected data after upload checkbox option applies to collected data in the batch application.
- When marked all collected data will be purged after it has been uploaded to the main web application. This setting applies to IntelliTrack Mobile Batch only.
- When unmarked all collected data will remain in the application and will be available at the View Collected Data form after it has been uploaded to the main web application. (You are able to manually purge the collected data at the View Collected Data form.)
Saving your Preferences
To save your user preferences, tap the Save icon found in the lower half of the User Preferences form.

A Cancel icon is also available, if you do not want to save your user preferences, tap the Cancel icon found in the lower half of the User Preferences form.
